When I lived in Maryland, going to Value Village was one of my favorite pastimes. Of course, I preferred to go on SALE days, I mean even thrift store shoppers like me love the extra bargain. I never worried about stuff getting bought out from under my nose because I have pretty weird taste compared to what most folks were buying. I’m usually looking for the forlorn, lost, handmade sweater or pair of socks that someone, for some reason, has abandoned. They’re always there.
Juneau has two thrift stores. Out in “The Valley,” St. Vincent de Paul’s has a knitter on staff who identifies cool knits and makes sure they don’t sell for too cheap. They’re still a bargain. That’s where I found my favorite sweater from last year. The other day I was at our local Salvation Army on a tip that they had some cool quilted military issue snow-pant liners for a dollar. (I did score those, but that’s another story). Anyway, this particular thrift store doesn’t usually have much in the way of sweaters, but I took a quick look anyway, and found one.
This sweater is vintage–I’m guessing from the early 1960s. It’s handmade, but sold commercially. The little label says “100% wool. Made in Italy.” No brand name. It’s constructed in pieces, with raglan shaping and 3/4 length sleeves. The yarn is a bulky, soft two-ply in natural kind of oatmeal color. I’m tempted to dye it, but I don’t have another white cardigan, so maybe I won’t. The cool thing about the lace pattern is that it’s all done in reverse stockinette. The eyelets look much prettier that way. If I were to copy this sweater, I would certainly knit it in one piece from the neck down. I don’t think I will recreate it, but I may play with the stitch pattern in a hat or cowl.
Last weekend, I took a road trip with my dear friend Charlotte, and to thank her for doing all the driving, I knit her a little headband, reverse-engineering from a photo she found on the Interwebs with some gorgeous, hefty, cable-spun merino. I knit on and off for the trip from Seattle to Bend, Oregon, finishing by headlamp just before we got to our destination. Charlotte promised me that she and Headband would have loads of adventures together and today I got my first pictorial report.
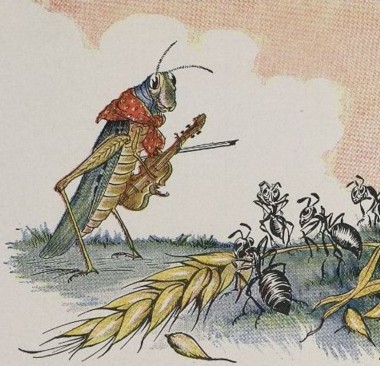
We have a tough job here in the North during summer. It’s like we have to play both sides of Aesop’s fable of the grasshopper and the ant: we must play while the sun shines AND save enough food for winter. With a summer like the one we just had, it seems like the harvesting has been plentiful, but the play was lacking—the ant won. It’s a good thing we find ways to keep the grasshopper playing in the winter too.
Here in Juneau, there’s not an annual moose hunt the way there is in Cordova, and I’ve been watching the results of this year’s hunt in Cordova with interest. It’s great so see so many successful women hunters and their helpful teams of men and women putting up the meat that will feed many families for the winter. Last year, I was on the periphery of a moose butchering team when James helped harvest a moose that had been donated to a local food bank. I helped by keeping James and his buddies supplied with butcher paper, coffee, and snacks. It was amazing to watch that huge volume of food get processed in record time. Back in Cordova, I hear that moose fat can be rendered and used as a delicious replacement for shortening. Erica Thompson says it smells awful while it’s rendering, but tastes just great in baking once it’s done. (On hearing of Erica’s experiments, Becca Dodge mentioned that she and Mark once rendered bear fat that was a lovely shade of blue due to the bear’s generous blueberry diet.)
Since I stopped eating meat in my early twenties, and didn’t come back to it until we had plentiful wild game and fish here in Alaska, I often look to my childhood, and my Syrian grandmother’s recipes for inspiration. When I was little, one of Sitto’s family meals wouldn’t be complete without kibbee—spiced ground meat mixed with cracked wheat, then served raw, baked, or fried. I love my grandmother’s baked kibbee with it’s creamy, nutty filling. It tastes delicious made with ground moose.
To begin the kibbee, I rinse some fine cracked (bulgar) wheat, then let it soak in clear water for about ten minutes. Drain the water with a sieve, and squeeze out any excess liquid. Add two pounds of ground meat (minus a half cup set aside for the filling), a large onion diced fine, a teaspoon of salt, and some freshly ground black pepper. I divide the meat mixture in half, and press the first half into the bottom of a greased 9×13 glass baking dish. To make the filling, I brown the reserved meat and add a half cup of pine nuts (my grandmother disliked pine nuts and always used chopped pecans. I like it both ways). To the browned meat, I add a package of cream cheese or a cup of yogurt cheese (yogurt that’s been strained overnight through cheese cloth). I season the filling with dried mint, salt and pepper to taste. Spread the filling over the first layer of meat, then press the other half of the meat mixture gently on top of the filling layer. This is hands-on work, and I find that dipping your hands in water makes it easier to smooth the meat mixture without having it stick to your hands. I use a sharp knife to make diagonal cuts in perpendicular lines across the dish creating diamond shaped pieces of kibbee. Pour a half cup of melted butter over the top of the kibbee, then bake at 350F for about 15 minutes or until the meat is cooked through, and kibbee is browned. Kibbee is delicious hot from the oven, and makes a great cold lunch the next day.
This weekend, I was the grasshopper. I danced with friends at the fall’s first square dance and found on Sunday afternoon I had to scramble to pull something together for supper. While we had our quickly made dinner of bean and rice burritos we planned for next Sunday’s meal to be something warm and inviting. We’ll be ants this week, planning and foraging, and I’m guessing moose will be on the menu.
Baked Moose Kibbee Ingredients
2lbs ground moose meat (less 1/2 cup reserved for filling)
1 1/2 cups fine cracked (bulgar) wheat
1 large onion, diced fine
1 teaspoon salt
Pepper
1/2 cup melted butter
Filling:
1/2 cup ground meat
1 package cream cheese or 1 cup yogurt cheese
1/2 teaspoon dried mint
1/2 cup pine nuts or chopped pecans
Salt and pepper to taste
There’s a small but growing boy in my house who needs a new hat. Last week, he put on the hat I made him a couple of summers ago and said, “my hat shrunk!” I think it’s more likely that his head grew, but either way, it no longer fits.
Jay wearing his hat in 2010 when it had just been finished.
The air was so crisp this morning–it was a perfect fall day, but I felt bad sending him to school with a bare head. So this evening I’m taking a break from my growing ripple scarf (It tops two feet thanks to rehearsals for the cabaret I was involved with last week!) to make him a hat.
The crown of the hat after about an hour of crocheting.
It’s crocheted in the round, single crochet in the back loop with the increases concentrated in four spots to create corners. Once I stop increasing, of course, the shape will transition back to round.
I’ll post a picture of Jay modeling the finished hat when it’s done.
Nine in the morning came a bit early last Thursday. It was chilly and overcast on my walk down Lake Avenue, but when I arrived at The Little Chapel kitchen I was greeted warmly by our visiting chefs, Marge Perry and David Bonom. I found an apron, (and I was the first to soil one too, with a splash of melted chocolate), put up my hair, and and set to work. “Did you secure your board?†Marge asked. I hadn’t, since I didn’t know what she meant. A damp paper towel underneath a big cutting board keeps it from sliding around the counter while you work. Erica Thompson arrived soon after I did and joined the desert team. We melted chocolate, and we beat eggs—we marveled at how the butter we were using made the chocolate and the filo dough act funny. The next day, Marge told us she had had a eureka moment back in the hotel realizing the butter must have a higher water content than what she is used to using. (Note to self: fat makes butter better). More volunteers arrived—Jen Pickett and Beth Poole who washed and dried and chopped vegetables. We ended the day with a fridge full of our industriousness, and with not one dish completed. But that was the plan: two days to prep and cook, leaving Saturday to finish and arrange, heat and plate and make the things that couldn’t be done ahead.
Photo by Diane Jeantet for The Cordova Times
Marge and David are married partners as well as co-chefs in our mushroom adventure, and it wasn’t long before we got to experience their good natured ribbing of one another. Marge calls David “EBO†which stands for “Extremely Bald One.†David, who grew up in Queens, NY and has the accent to prove it, is quick with a silly pun, and just as quick with the romantic story of how he and Marge met at Red Lobster.
I was expecting to learn, but I was surprised both by how much I learned and by how skilled Marge and David are at teaching. I love being in the position of student because along with it comes that blessed freedom to not know how to do everything—to be forgiven for small mistakes like chopping the chives too large, or leaving an egg unbeaten. Working with Marge and David, you get cheerfully teased for mistakes, and you get patiently taught helpful techniques. Here are some things I know now that I didn’t know before three days in the kitchen with Marge:
How to make Filo Cups—the delicious crispy outsides of our Fungus Festival desert come from a sheet of dough crumpled just-so in a muffin tin. After making more than 80 of them with Erica Thompson (who got the zen of filo faster than I did), I am much better than when I started.
How to slice/chop/dice with a chef’s knife much more efficiently than before. Marge and David were both generous with cooking techniques and tips. At one point in my frustration at trying to get those chives just right, Marge, who teaches in New York at the Institute for Culinary Education (ICE), asked if she could guide my hand with hers. A few moments of hands-on attention, and things got easier.
Don’t get between a chef and her knife. Oh, I knew better than to use a chef’s personal knife, but I didn’t realize that if my hand absentmindedly went for a knife that was innocently lying on the table, that chef’s attention would be instantly attracted to me. Of course I wasn’t going to use your knife. I have this lovely one right here.
For goodness sakes, hold your knife at waist level with the point down if you have to walk across the kitchen. And DO NOT gesture with said knife. Oops.
How to make your own mascarpone when (surprise!) you can’t find any on local grocery store shelves. From our own local chef, Mikal Berry. With a mixer, combine 1 part sweet cream butter to 4 parts cream cheese). Use as for mascarpone in any recipe.
If you watch cooking shows on television you might have the impression that New York chefs are creative, hard working people with big egos and short tempers. I didn’t see a temper flare all week, beyond a classic over-the-glasses mom stare, when I maybe got caught sneaking a tiny crumb of cake that was actually already broken and unusable anyway. Ahem.
Marge Perry has all the creativity and glamour of a TV chef and she brings with it the kindness, patience, and charm of a skilled teacher. Lucky for us, she also brought along Chef David Bonom. And guess what? These real-life chefs are just like the rest of us—they love good food regardless of context—home cooking, or lunch from a taco bus or a pizza trailer. I got the feeling that Marge and David enjoyed Cordova as much as we enjoyed having them. I wouldn’t be surprised if they’re cooking with us again someday.
3 cups milk
2 cups half & half
1 teaspoon salt
1 1/4 cups dry polenta
1/2 cup cream cheese, softened
3 tablespoons black truffle butter
2 tablespoons truffle oil
1/3 cup grated good quality Parmesan cheese, such as Parmigiano-Reggiano
Combine the milk, half and half, and salt and in a large saucepan over medium-high heat.
Bring to a boil and add the polenta in a slow steady stream, whisking constantly. Reduce
the heat to medium-low and cook the polenta, stirring often, until mixture is thick and
creamy, 25-30 minutes. Remove from the heat and stir in the cream cheese, truffle butter,
and truffle oil, stirring until the butter and cream cheese melt. Stir in the Parmesan cheese
until well combined. Serve immediately or reheat in a saucepan over medium heat,
adding a little milk and stirring until hot and creamy.
Makes about 8 cups (6-8 servings)
Note: If available, you can substitute quick cooking polenta, which will reduce the
cooking time to 5-8 minutes. For a slightly less rich version leave out the half & half and
use 5 cups of milk.
***
Update: 9/30/2012 — Chef Marge has written her own report of the Fungus Festival weekend on her blog.
“Like a blanket to wear around your neck,” we agreed. I’d been chatting with Melissa, who owns Seaside Yarns–the lovely little yarn shop here in Juneau. We are both crocheters from childhood and we have strong associations with granny squares and the popular zigzag patterns of the 1970s. My house has my grandmother’s scrap blankets on various beds and couches. We reach for them when we’re chilly or just need to feel comforted.
Missy and I wanted to have a fall project that would be soft and meditative, comforting. I had seen someone crocheting a ripple-stitch baby blanket the other day out of fingering weight baby yarn and that gave me the idea for a scarf. We settled on sock yarn–fine, washable, generous put up. And we picked a simple two-color stripe. It was serendipity that Missy had just gotten a new sock yarn into the shop–“Nordly’s Superwash” from Viking of Norway is a single-ply 75% wool, 25% nylon yarn with long color repeats that just begged to be turned into a stripy, ripply scarf.
So, join us, if you will, in rippling. You can use any yarn and hook you like. I’m using a US size F.
This is a one-row pattern that takes no time to memorize, so you’ll be rippling meditatively as you contemplate the color changes in your scarf or the ones out the window. Or, like me, you can listen to a book “on tape.” Mine is yet another vampire novel that I’m listening to via audio-book (A Discovery of Witches by Deborah Harkness,[ref]It was with this book that I discovered Amazon, who owns Audible.com now has the option of purchasing a bundled audio and kindle version of certain books, you can start reading, listen a bit, then go back to reading and your location is sync’d. The weird thing is, it’s cheaper to buy the kindle edition first and then add “voice narration,” than it is to buy the audiobook and subsequently add the kindle version.[/ref] thank you, Marly Bird for the recommendation).
Abbreviations:
sc-bl = single crochet in the back loop of the stitch. This makes the yummy, scrunchy ribbed texture of this scarf that compliments the undulations of the ripple.
shell = 3 sc-bl, or 3 sc in the foundation row, in the stitch indicated. After the foundation row, the shells will always be worked in the center stitch of the shell from the row below.
The pattern is adapted from Jan Eaton’s wonderful resource 200 Ripple Stitch Patterns. It’s a multiple of 11 stitches +10. You can make yours as narrow or as wide as you like. I began with a chain of 54, (i.e. 44 +10)
How to Ripple:
Foundation Row: Â sc in 2nd ch from hook, and each of next 3 ch, *[shell in next ch, sc in next 4 ch, sk 2 ch, sc in ea of next 4 ch.] Repeat from * to last 5 ch, shell in next ch, sc in next 4 ch, turn.
Pattern Row: Ch 1. Skip 1st sc, sc-bl in the next 4 stitches *[shell in next st, sc-bl in next 4 sts, sk 2 sts, sc-bl in next 4 sts.] Repeat from * to last 6 sts, shell in next st, sc-bl in next 3 sts, skip 1 st, sc in both loops of final st, turn.
Repeat the pattern row to grow your scarf. Change colors every two rows carrying the unused color not too snugly up one side of the scarf. [ref] A little note about changing colors: when you reach the end of the second row of a color finish the final stitch by pulling up the last loop with the new color. That way your turning chain will be in the new color.[/ref]
Work the ripple, as Elizabeth Zimmerman might say, “until you can’t stand it any longer,” or until the scarf is generous enough to make several warm wraps around your neck or until you run out of yarn. I picked one multi-colored stripe and one semi-solid, and I’m already enjoying watching the shifts in color and the variations of contrast happening with my scarf. Yes, I’m easily entertained. Will we decide to add an edging or a fringe? Only time will tell. Let me know in the comments if you decide to join our ripple-along.
A couple of weeks ago, I took the kids on our our first pilgrimage “down south” since 2010 to my family’s tiny cottage in Northern Wisconsin. People from my dad’s side of the family have been spending the summer in those woods on Lac Courte Oreilles for a century. I didn’t grow up in Wisconsin, but I grew up riding in the back seat of one tiny car or another from Upstate New York, through the homes of various friends and relatives, to our cottage, where we’d spend a couple of weeks each summer. The cottage is one of those places that feels like home: the smell of the pine, the stark white of birch trees against the green of the rest of the forest, the buzz of dragonflies and mosquitos, the way the grass feels dry and prickly underfoot in the August heat. So it was a surprise to me this summer when I realized there are many ways I don’t know the place at all.
I know a tiny August sliver of these woods, but I know them the way a child would. I know not to touch poison ivy, to chew but not swallow wintergreen leaves for a treat that tastes like Life Savers, to canoe in the morning or at sunset when the lake is calm. I know that the land where we have our cottage is in traditional Ojibwa territory. I don’t know The North Woods the way I was beginning to learn my way around Cordova-the way, after three trips through the seasons, I was beginning to absorb the rhythm of the foraging year, from fern fronds and fireweed stalks to devils club buds and spruce tips, berries and mushrooms.
This year, we were at the lake a little later in August than usual, and I noticed that under those tasty wintergreen leaves there were bright red berries. Are those edible? (They are, and they taste minty like the leaves). I’m not the only one wondering. There was a book lying on the table in our cottage titled, “Jiibaakweyang,” which means, “We are Cooking Together,” in Anishinaabe, the language of the Ojibwa. The library at the local Ojibwa Community College collected the recipes and published the booklet. The members of the Ojibwa Community are actively working to learn and preserve their language and record and revitalize the traditional knowledge of the place where they live. Here’s an excerpt from a traditional recipe for Wintergreen tea:
“One woman’s handful of wintergreen leaves, 1 quart of red maple sap. Rinse the leaves if you have doubts about which beings have walked over them. Strain the fresh sap thru a cloth to remove bits of bark that would flavor the sap in ways you don’t want. Put the leaves in the sap and cook them…until almost boiling-not quite.”
I’ve never been at the cottage in sugaring season, so I’ve never tasted maple sap fresh from the tree, but it sounds delicious.
I subscribe to a food magazine called Lucky Peach. The magazine is usually filled with chefs like David Chang and Anthony Bourdain writing about eating too much in exotic places like Kyoto or Copenhagen. This quarter they produced an American Food issue, and in the middle of loud pieces on Kansas City pork barbecue and San Francisco seafood a more reflective essay caught my attention: “No reservations-The Hard-won Nourishment of the Ojibwe Tribe,” by David Treuer. Following his people through their history as a coastal tribe living in around the mouth of the St. Lawrence Seaway, through their migration to lake regions around the upper midwest, he searches for the culinary traditions of his people disrupted by war, westward expansion, and resettlement in reservations. He shares his family’s love for maple syrup, wild rice and fresh fish.
It’s unlikely that I’ll ever know more than that late summer piece of what life in The North Woods is like, but I’m paying more attention. And I’m enjoying the bounty of a hot summer that can be elusive for us as Alaskans: fresh corn on the cob, vine-ripened organic tomatoes, and enough watermelon to make a small boy’s belly burst. Here’s a recipe for my family’s take on German Potato Salad. It’s something we can make year-round and anywhere in the country to remind us of summer meals on the screened-in porch-grilled bratwurst, Wisconsin beer, and a table overflowing with food grown nearby.
Cookie Buschmann’s German-ish Potato Salad
2 pounds small red potatoes
1 cup diced dill pickles
1 cup diced sweet onions
2 hard boiled eggs, peeled and diced
Dressing
1/3 cup cider vinegar
1/4 cup olive oil
3 T sugar
1 T stone ground mustard
1 t sea salt
1/2 t cracked pepper
Chopped fresh chives and parsley if you have them
Wash the potatoes and trim off any bad spots. Do not peel. Boil the potatoes until they are fork-tender. Drain, and allow to cool slightly-they can be warm. When they are cool enough to touch, Dice the potatoes in 1/2 inch pieces. Mix in pickles and onions. In a small bowl, whisk together, oil, mustard and vinegar, add sugar, salt and pepper. Stir in herbs. Pour the dressing over the potato mixture, then stir in the chopped egg. Season to taste with salt and pepper.
If you’ve been reading this blog for a while you might have noticed that for the most part, my recipes are vegetarian, and often vegan. I stopped eating meat in 1996, and I was vegan for several years. I worked as a vegan chef in North Carolina, I was the nutrition editor of a vegan magazine for parents, I volunteered for the Earth Save, a vegan organization in Seattle. So, I wasn’t just a little bit vegetarian. When I moved to Alaska, my diet shifted. My politics didn’t. I still believe strongly in all of the environmental and ethical reasons for being vegetarian that I did before. I just found that in Alaska, I could eat wild game and fish that was sustainably caught and hunted by friends and family. Many Alaskans naturally live a lifestyle that enlightened city-dwellers elsewhere aspire to: they eat locally, they live with less stuff, they think carefully about their consumption. I made up a name for my family’s style of eating: Alaskatarian.
Recently, I started writing a column for The Cordova Times about food and life in South Central and Southeast Alaska. I used the same name “Alaskatarian” for my column. I’ll be cross-posting those pieces here on the blog from time to time, and I’ll link to the columns from this page. The recipe for the Salmon-Feta Savory pies you see above was in my first column, below.
I’m spending twelve days in Anchorage for my MFA residency. All the folks in the UAA low-residency masters in creative writing program gather once a year in July. We spend the day attending talks about the craft of writing and discussing one another’s work. It’s inspiring and exhausting. It’s one of my favorite times of year. There is a lot of sitting. I bring knitting or crochet along to keep my hands busy and focus my attention on the speaker.
I didn’t have too much time to plan projects, so I grabbed some yarn and hooks, and decided I decided that to revisit double crochet mesh. It’s airy and summery; mesh fabric grows quickly and drapes beautifully. I can crochet it without much thought. I’ve finished a scarf, and I’ve just started this little triangle shawl in Kauni. I love seeing the subtle shifts in color. I started this shawl a few times yesterday playing with where to place the increases. I’ve settled with edge and center increases in each row, and I like the winged shape that is forming. As I crochet the simple shawl, I’m meditating on what kind of edge might look nice.
Somehow over the course of a couple of days, we got from this:
To this:
Well… I blame Rebecca, who said this:
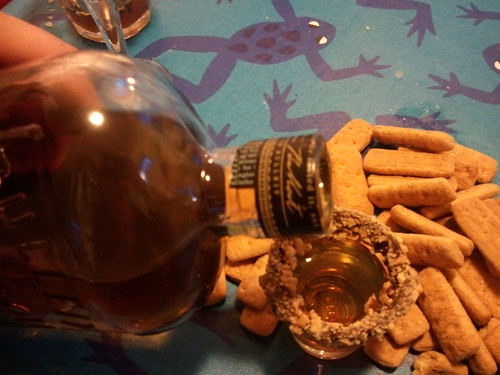
See… On Sunday, my birthday, the kids presented me with a homemade marshmallow “shooter.” They made some for themselves too. After the kids went to bed, we adults tried them out. I have to admit they are fun. The photo (above) on Facebook was proof.
Rebecca glanced at my caption before looking at the photo and thought I was talking about some kind of mixed drink. I saw her comment and thought, why shouldn’t there be a drink too? So, I mused on it a little, and chatted with my friend Stacy and bought some supplies… And last night we experimented a little coming up with…
The Marshmallow Shooter
Ingredients
Bourbon
Marshmallows
1/2 c. Chocolate Chips
2 Graham Crackers (crushed)
Shot glasses
Crush the graham crackers (we did it by hand)
Melt the chocolate chips (we did it in the microwave)
Dip the shot glass in the chocolate (I was pretty generous with the chocolate), and then coat with graham cracker crumbs. Toast your marshmallows. (We didn’t have a fire or hot coals, we used a candle, which doesn’t really toast the marshmallow–but it got the edges crispy. I think it’s better that the inside of the marshmallow is not melted).
Fill your shot glass with bourbon.
Put the marshmallow into the glass and let it soak for a minute. Take a bite of bourbon-soaked marshmallow, and then a sip of burbon with the coated rim. Enjoy! (Warning: This type of deliciousness has been known to lead to repeat consumption, and even rare cases of ukulele playing.)


 Â by Deborah Harkness,[ref]It was with this book that I discovered Amazon, who owns Audible.com now has the option of purchasing a bundled audio and kindle version of certain books, you can start reading, listen a bit, then go back to reading and your location is sync’d. The weird thing is, it’s cheaper to buy the kindle edition first and then add “voice narration,” than it is to buy the audiobook and subsequently add the kindle version.[/ref] thank you,
 by Deborah Harkness,[ref]It was with this book that I discovered Amazon, who owns Audible.com now has the option of purchasing a bundled audio and kindle version of certain books, you can start reading, listen a bit, then go back to reading and your location is sync’d. The weird thing is, it’s cheaper to buy the kindle edition first and then add “voice narration,” than it is to buy the audiobook and subsequently add the kindle version.[/ref] thank you,  . It’s a multiple of 11 stitches +10. You can make yours as narrow or as wide as you like. I began with a chain of 54, (i.e. 44 +10)